Patience Corner
My site is named after a quilt block that caught my eye one day when I was surfing the web. I enjoy viewing craft blogs, and I'm particularily fond of quilting and paper-craft sites. I hope to chronicle my projects on this website and provide useful links to others who may want to try the same projects.
Saturday, February 9, 2013
I made this quilt for a girlfriend to give to her at her baby shower. The pattern was forwarded to me by my cousin, who had taken it from a quilting magazine. She made an ABC quilt for me when I was pregnant with my first child. That quilt is dear to me because she used pieces of our grandmother's clothing in each of the quilt blocks.
For this gift, I used a batik charm pack for the letters and shapes. I found complimentary fabrics for the sashing, along with orange and blue solids.
Brick Path Quilt
I love Amy Butler fabrics and the free patterns you can access on the web. My latest quilt was loosely based on Amy's Lotus Brick Path quilt design: http://www.amybutlerdesign.com/pdfs/LotusQuilt.pdf
I picked out my eleven fabrics at JoAnn Etc. I can't pass up a coupon, especially when you need to purchase so much. But I've learned to watch the quality there. Some of what I've purchased in the past has been very thin and poor quality. But for this quilt I was able to find a nice variety of prints in the color families I desired.
I used the Amy Butler pattern for the material list and cutting instructions, but I didn't use the layering technique and pom poms the original design called for. I used one of my fabrics for the quilt back and bias tape, finishing it with traditional binding.
Now the finished quilt is hanging on a rack in my family room. The colors are complimentary to the room. My husband said it's his favorite of the quilts I've made so far.
Monday, June 18, 2012
Double Wedding Ring Table Runner
I made this project using the Quiltsmart pre-printed interfacing panels. I purchased them from my local quilt shop where they are available-not by the yard-but by the panel. One panel was enough for this project.
Per the Quiltsmart instructions, after you make all your fabric cuts, you sew the interfacing to the right side of the fabric along the printed lines. Once sewn, trim the extra fabric away and turn the tube right side out. In my project I decided to use solid color rings, but you can certainly use the template and instructions to sew multi-fabric rings.
I finger-pressed the tube-rings flat, pinned them to the background fabric, and then pressed and fused them together with a warm iron. The interfacing is strong enough to gently adhere the rings to the background fabric, but not strong enough that you don't have to go back and stitch the rings in place. I used a blanket stitch in a coordinating thread color.
I used echo lines to quilt the outside border of the table runner. I used a water-soluble fabric-marking pen to transfer a custom design to the inside of the rings. Even though I was using my free-motion foot, I found that keeping the feed dogs up helped me keep my stitches more evenly spaced.
When I was sewing on the binding, I pinned in and secured two fabric triangles in the corners at one end. I took a square of fabric and folded it on the diagonal so I didn't have frayed edges. Plus, it gave the fabric strength if the finished project was going to be hung on a wall instead of displayed as a table runner.
Saturday, February 11, 2012
Modern Method Beginner Sampler
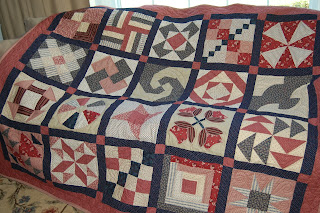
This is the finished project from a 8-week class I took at a local fabric shop. This 20-block sampler quilt was made using all modern methods, including rotary cutting, templates, quick-sew triangles and fusible applique. The completed quilt was roughly twin-size. I used the services of a local long-arm quilter for all the machine quilting.
For the backing, I used a coordinating medium blue fabric and used the fabrics from the front to skunk-stripe the seam.
Saturday, December 3, 2011
Nine patch quilt pattern
I just completed two nine-patch quilts for my boys. They use the same pattern (http://www.quiltsforkids.org/patterns/31/nine-patch-quilt-pattern/) but use completely different fabrics.
I finished this dinosaur quilt first. I love color and pattern, and this one boasts plenty of both. The nine patch is made up of a colorful stripe and green zebra print. The large blocks depict a variety of dinosaurs.
I used a verigated thread to quilt the center of the quilt. I thought it would be a fun addition to the design, but I must say, I was disappointed with the result. I wasn't disappointed with the design itself. I used my sons' dinosaur puzzle to trace shapes onto freezer paper. I cut the shapes out and used them as a template to create a design within the blocks.
The second quilt has a shark theme. The colors are taken from the main fabric, the sharks used in the large blocks. The fabrics in the nine-patch have patterns that are fluid or have the movement of water.
I did something similar to the dinosaur quilt with the machine quilting. I took the shark shape from the boys' puzzle and traced it on freezer paper to use as a template. These were used all over the inside of the quilt.
I found the border design online. It looks like waves crashing on the beach, which fits in perfectly with the rest of the water theme on this quilt.
I finished this dinosaur quilt first. I love color and pattern, and this one boasts plenty of both. The nine patch is made up of a colorful stripe and green zebra print. The large blocks depict a variety of dinosaurs.
I used a verigated thread to quilt the center of the quilt. I thought it would be a fun addition to the design, but I must say, I was disappointed with the result. I wasn't disappointed with the design itself. I used my sons' dinosaur puzzle to trace shapes onto freezer paper. I cut the shapes out and used them as a template to create a design within the blocks.
Within the rest of the blocks, I used a sucked-in square shape. On the border, I used a continuous line pattern I found online that reminded me of claws and teeth.


The second quilt has a shark theme. The colors are taken from the main fabric, the sharks used in the large blocks. The fabrics in the nine-patch have patterns that are fluid or have the movement of water.
I did something similar to the dinosaur quilt with the machine quilting. I took the shark shape from the boys' puzzle and traced it on freezer paper to use as a template. These were used all over the inside of the quilt.
I found the border design online. It looks like waves crashing on the beach, which fits in perfectly with the rest of the water theme on this quilt.
Saturday, August 27, 2011
Finished Quilted Table Runner
I was able to complete the table runner in my last post this week. I modified the technique quite a bit, but I ended up with a completed product that looks very similar.
Instead of sewing the strips directly to the back and batting, I pieced the strips together before I created the quilt sandwich. I used my walking foot to "stitch in the ditch" along each seam.
I used additional scraps to piece together the back of the runner. I created the binding from one of the fabrics I used on the front. I cheated and used my machine for all the sewing need to attach the binding.
I plan on bringing this runner to our cottage in the Finger Lakes. The blues will compliment the slip covers I have on the couch and chair in the living room.
Wednesday, August 24, 2011
Easy Quilted Table Runner

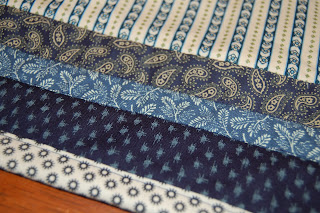
So, I've been admiring this tutorial for a while. I think the colors in the sample are fantastic. And the directions seem so easy to follow I keep coming back to the webpage to see it again. I have some blue and tan scraps in my sewing room left over from a large sampler quilt I made in a beginners quilting class this spring. I'm going to give it a shot!
http://www.diaryofaquilter.com/2010/08/table-runner-tutorial.html
Subscribe to:
Comments (Atom)

.JPG)
.JPG)


